
Why That One Door Always Leaks: Diagnosing and Sealing Chronic Problem Spots

Every time it rains—not even a major storm, just a decent downpour—that same door lets water creep underneath. You've stuffed towels against it. You've tried weatherstripping. Maybe you've even repositioned the doormat like that would somehow help. And yet, there it is again: a puddle forming on your floor like clockwork.
Quick answer: Most chronic door leaks come down to one or more of these culprits: worn door sweeps, damaged thresholds, improper door hanging, foundation settling, or poor exterior grading that directs water toward the door instead of away from it. The fix depends on which issue (or combination) is causing your problem—and sometimes you need temporary protection while you work on a permanent solution.
Some doors genuinely are chronic leakers, and there are specific reasons why. Once you understand what's causing the problem, you can actually fix it. This guide walks you through diagnosing chronic leak spots and sealing them effectively—including how FloodTape® can serve as a reliable, removable solution when you need protection fast.
Why Chronic Door Leaks Happen (And Why They Keep Coming Back)
Water is relentless. It doesn't care about your renovation timeline or your nice hardwood floors. According to FEMA, even one inch of floodwater can cause over $25,000 in damage to an average home. That's not a typo. One inch.
Most chronic door leaks aren't caused by catastrophic flooding, though. They're caused by small, persistent issues that compound over time. Understanding these root causes is the first step toward actually solving the problem.
The Usual Suspects Behind Recurring Leaks
Worn or Missing Door Sweeps
That rubber or brush strip at the bottom of your door? It has a job: keeping water, drafts, and debris out. Over time, door sweeps compress, crack, or fall off entirely. When that happens, there's nothing between the bottom of your door and the outside world except a gap.
Threshold Damage or Misalignment
The threshold—the raised strip your door closes against—takes a beating from foot traffic, temperature changes, and settling foundations. Cracks, warping, or shifting can create uneven gaps that let water pool and seep through.
Improper Door Hanging
Sometimes the problem started during installation. A door that doesn't sit flush in its frame will have inconsistent gaps. Water finds those gaps every single time.
Foundation Settling
Houses move. Over years, foundations settle unevenly, and door frames twist or shift along with them. What was once a perfectly sealed door can develop gaps that grow wider each season.
Poor Exterior Grading
If the ground outside slopes toward your door instead of away from it, rainwater has nowhere to go except straight into your home. This is one of the most common—and most overlooked—causes of chronic leaks.

Diagnosing Your Chronic Leak: A Step-by-Step Approach
Before you can fix the problem, you need to find it. Here's a systematic diagnostic method that works for homeowners and small business owners alike.
Step 1: The Visual Inspection
Start with the door closed. Get down at floor level and look at the gap between the bottom of the door and the threshold. Is it even? Do you see daylight coming through anywhere?
Next, examine the door sweep. Is it:
Still attached?
Making full contact with the threshold?
Free of cracks, tears, or compression damage?
Check the threshold itself. Look for:
Cracks or chips
Warping or bowing
Rust (on metal thresholds)
Gaps where it meets the doorframe
Step 2: The Water Test
This sounds obvious, but it's surprisingly effective. On a dry day, have someone spray the outside of the closed door with a garden hose while you watch from inside.
Pay attention to:
Where water first appears
Whether it comes through the bottom, sides, or corners
How quickly it accumulates
This tells you exactly where your seal is failing.
Step 3: The Paper Test
Open the door, place a piece of paper on the threshold, then close the door on top of it. Now try to pull the paper out.
If it slides out with little or no resistance, your seal is compromised at that point. Repeat this test at several spots along the full width of the threshold. Mark any locations where the paper pulls free easily—those are your priority zones.
Step 4: Check the Exterior Grade
Walk outside and observe how water flows during or after rain. Does it pool near the door? Does the ground slope toward the threshold? If rainwater has a clear path to your door, sealing the door itself is only half the battle.
Common Chronic Leak Scenarios and How to Address Them
Scenario 1: The Garage Door Gap
Garage doors are notorious for leaks, particularly at the corners and along the bottom seal. The rubber gasket at the base compresses over time, and the door panels themselves can warp from temperature fluctuations.
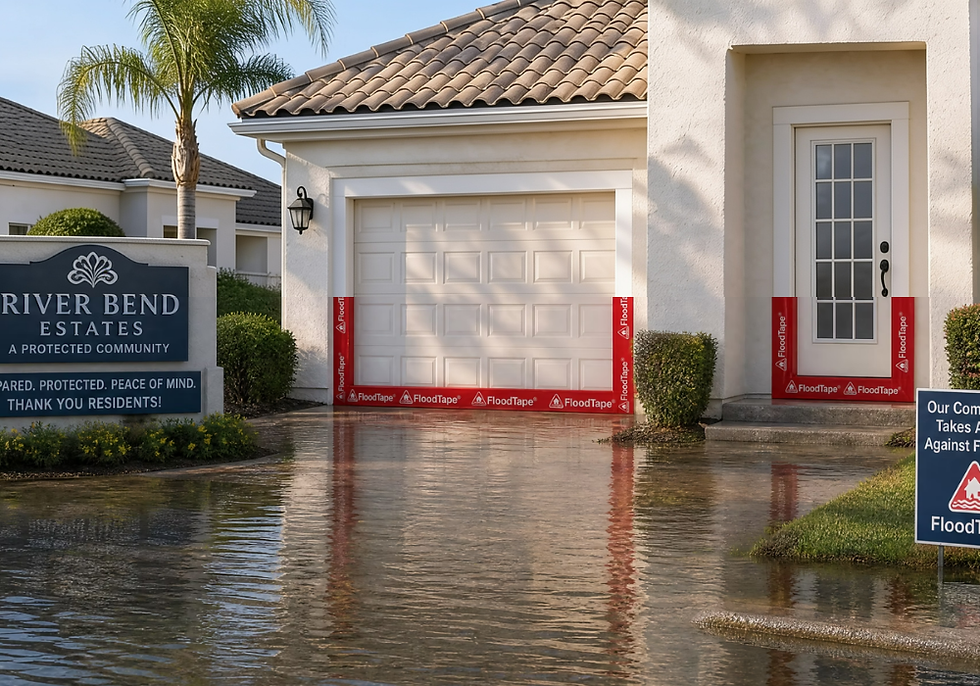
What to do: Replace the bottom seal if it's worn. For temporary protection during storms, a wide adhesive tape like FloodTape® can be applied along the bottom and side gaps to create a watertight barrier. The key is ensuring the tape is wide enough to span the entire gap—FloodTape®'s 8-inch width makes it effective for covering larger openings without requiring multiple overlapping strips.
Scenario 2: The Side-Hinged Entry Door
This is the classic problem door. The sweep is worn, the weatherstripping has compressed, and every rainstorm brings a small lake into your foyer.
What to do: Start by replacing the door sweep and weatherstripping—these are inexpensive fixes that often solve the problem entirely. You'll need a tape measure, screwdriver (or drill), and the replacement sweep itself, which typically costs under $20 at most hardware stores. If your door frame has shifted over time (common in older homes), you may need to adjust the hinges or plane the door to achieve a better fit.
For immediate protection during heavy rain or flood warnings, apply FloodTape® around the door perimeter, overlapping at corners to ensure continuous coverage.

Scenario 3: The Basement Door or Bulkhead
Basement entries sit low and often collect water that drains from higher ground. They're also prone to foundation settling issues.
What to do: Improve exterior drainage by ensuring the ground slopes away from the door. Consider installing a small trench drain in front of the threshold. For storm protection, sealing the door with waterproof tape provides a quick barrier while you work on longer-term drainage solutions.
Scenario 4: The Slider or Patio Door
Sliding doors have tracks—and tracks have drainage holes that can clog. They also have seals that wear out and rollers that can drop the door lower over time.
What to do: Clean the tracks and drainage weeps regularly. Adjust the roller height if the door has dropped. Apply weatherstripping designed for sliding doors. For temporary flood protection, tape can be applied along the track edges and the gap between fixed and moving panels.
Scenario 5: French Doors or Double Doors
French doors and double doors leak at the center meeting point (called the astragal) more than almost anywhere else. The astragal is the vertical strip where the two doors come together, and even slight warping or misalignment creates a gap water loves to exploit.
What to do: Check that both doors are hanging level and that the astragal makes full contact when closed. Adjusting the strike plate or adding foam weatherstripping along the astragal can help. For storm events, run a strip of FloodTape® vertically along the center seam where the doors meet, then seal the bottom as you would a standard entry door.
When to Use FloodTape® for Chronic Leak Problems
FloodTape® isn't a permanent fix—and it's not trying to be. It's designed as a temporary, removable barrier that creates a watertight seal quickly and comes off cleanly when you no longer need it.
This makes it ideal for several chronic leak scenarios:
During Storms and Flood Warnings
When you know heavy rain is coming, applying FloodTape® to your problem door provides immediate protection without the mess and labor of sandbags. One Florida homeowner reported that FloodTape® held back two feet of water for 24 hours without any leak-through.
While You're Waiting for Repairs
Maybe you've identified that your threshold needs replacing, but the contractor isn't available for three weeks. FloodTape® gives you protection in the meantime.
For Seasonal Protection
Some leak problems only occur during specific conditions—monsoon season, spring thaw, hurricane season. Rather than installing permanent solutions for seasonal issues, temporary sealing allows you to address the problem when it's relevant and remove it when it's not.
On Rental Properties or Commercial Spaces
If you're a renter or property manager who can't make permanent modifications, a removable solution that leaves no residue and doesn't damage paint or surfaces is often the only viable option.
How to Apply FloodTape® to Problem Doors: A Step-by-Step Guide
Effective sealing isn't complicated, but technique matters.
Before You Start
Gather your materials:
FloodTape® (calculate roughly 20-25 linear feet per standard entry door)
Clean, dry cloths
Rubbing alcohol (optional, for degreasing)
Scissors or a utility knife
Check the weather: Apply tape to dry surfaces. The adhesive bonds best when the surface is clean, dry, and at moderate temperature.
Application Steps
1. Clean the Surface
Wipe down the door frame, threshold, and surrounding areas with a dry cloth. Remove any dust, dirt, cobwebs, or debris. For particularly grimy surfaces, a quick wipe with rubbing alcohol helps ensure strong adhesion.
2. Plan Your Coverage
Identify all the spots your diagnostic testing revealed as problem areas. For most chronic leak doors, you'll want to cover:
The bottom of the door (across the full width)
Both side edges where the door meets the frame
The corners where vertical and horizontal pieces meet
3. Apply to the Bottom First
Measure the width of your door. Cut a length of FloodTape® that extends 2-3 inches beyond each side of the door frame. Peel back the protective film and apply the tape so it overlaps both the door bottom and the threshold, creating a continuous seal.
Press firmly along the entire length, paying special attention to corners and edges.
4. Seal the Sides
Apply vertical strips along each side of the door frame, overlapping with the bottom piece by at least 2 inches. This overlap prevents water from finding a path between strips.
5. Check Your Work
Run your hand along every edge of the tape. Are there any bubbles, gaps, or sections that aren't fully adhered? Press these down firmly. Water will find any weakness in the seal.
Removal Tips
When the storm passes or the wet season ends, removing FloodTape® properly ensures no damage to your surfaces.
Pull back the tape slowly toward you at a 45° angle or lower. This is important—yanking quickly or pulling straight out can stress the adhesive and potentially damage the underlying surface. Slow and steady wins this race.
FloodTape® is designed to leave no residue on wood, glass, metal, stucco, vinyl, and most painted surfaces when applied to clean, dry surfaces and removed within the recommended timeframe.

A Customer's Experience: The Corner Shop That Stayed Dry
M. Dunlop manages a rental property in Arizona that had been plagued by flood issues for years. Every significant rainstorm meant water seeping through entry points, occasionally damaging the interior.
"I had tried various tapes and membranes but none of them worked out, or they damaged everything when I removed them," M. Dunlop explained. "When I heard about FloodTape®, I reluctantly decided to try a new product."
The results surprised even a skeptic. During an anticipated storm, M. Dunlop applied FloodTape® to the vulnerable entry points. The tape held back two feet of standing water for 24 hours—no leak-through, no water intrusion.
"When I went to remove the tape, I found absolutely no damage on paint or residue left," M. Dunlop reported. "I give it 100 out of 100. Thanks Floodtape®!"
The property now keeps multiple rolls on hand for storm season. What had been a recurring headache became a manageable, predictable part of weather preparation.
Your Chronic Leak Diagnosis Checklist
Use this checklist to systematically identify and address your problem door:
Visual Inspection
[ ] Check door sweep for wear, compression, or damage
[ ] Examine threshold for cracks, warping, or gaps
[ ] Look for daylight visible under or around the closed door
[ ] Inspect weatherstripping along sides and top
Testing
[ ] Perform water test with garden hose
[ ] Complete paper test along full threshold length
[ ] Note specific locations where water enters
Exterior Assessment
[ ] Check ground grading near the door
[ ] Identify any water pooling areas
[ ] Examine gutter and downspout drainage near entry
Immediate Protection
[ ] Clean and dry all surfaces before sealing
[ ] Apply waterproof tape to identified problem areas
[ ] Overlap all tape joints by at least 2 inches
[ ] Press firmly along all edges
Long-Term Fixes
[ ] Replace worn door sweeps
[ ] Repair or replace damaged thresholds
[ ] Adjust door hanging if needed
[ ] Address exterior drainage issues
When to Call a Professional
Some chronic leak problems extend beyond DIY territory. Consider bringing in a professional if:
Your door frame shows signs of structural damage or rot
Foundation settling has caused significant shifts in the door alignment
Water intrusion is accompanied by visible mold or mildew
Exterior grading issues require significant landscape modification
You've tried multiple solutions without improvement
A qualified contractor or home inspector can identify issues that aren't visible to the untrained eye and recommend appropriate repairs.

Take Control of Your Chronic Leak Problem
That one door doesn't have to keep leaking. With systematic diagnosis, targeted repairs, and effective temporary sealing when you need it, you can finally break the cycle of puddles, towels, and frustration.
The key is understanding that chronic leaks usually have identifiable causes—and those causes have solutions. Sometimes the fix is simple: a new door sweep or a tube of caulk. Sometimes it requires more involved work on thresholds, frames, or exterior drainage. And sometimes, you just need reliable temporary protection while you work on the permanent solution.
FloodTape® provides that reliable temporary seal—easy to apply, easy to remove, and designed to leave no residue or damage. It's not about replacing proper repairs; it's about giving you protection when you need it, without the complications of traditional methods.
Ready to finally fix that chronic leak? Check out FloodTape® here for an easy-to-install, residue-free sealing solution that protects your home or business when it matters most.
Frequently Asked Questions
How do I know if my door leak is a door problem or a drainage problem?
Perform the water test and observe where water enters. If it seeps under the door even with moderate water exposure, the door seal is compromised. If water only enters during heavy storms when it pools outside, drainage is likely the primary issue. Many chronic leaks involve both factors working together, so addressing both gives you the best protection.
Can I use FloodTape® on any type of door material?
FloodTape® adheres to most common building materials including wood, glass, metal, vinyl, and stucco. The key requirement is that surfaces must be clean and dry before application. For textured or porous surfaces, press firmly along all edges to ensure a complete seal. The 8-inch width helps span gaps effectively on most residential and commercial doors.
How long can FloodTape® stay applied to my door?
FloodTape® is designed for temporary use during storms or flood threats. For best results and cleanest removal, apply when protection is needed and remove once the threat has passed. The tape maintains its seal during weather events and removes cleanly when pulled slowly at a 45° angle or lower toward you.
Will fixing just the door sweep solve my chronic leak problem?
It depends on the root cause. A worn door sweep is one of the most common culprits, so replacing it is a logical first step and often costs under $20 with basic tools. However, if your threshold is damaged, your door frame has shifted, or exterior drainage directs water toward the door, you may need to address multiple issues for a complete solution.
Is it worth sealing a door that only leaks during major storms?
Absolutely. Even occasional water intrusion can cause cumulative damage to flooring, baseboards, and subfloor materials. Moisture that seeps in during storms can also contribute to mold growth. Addressing the problem—whether with permanent repairs or temporary sealing during events—protects your property from both immediate damage and long-term deterioration.
About This Guide
This guide was developed using established home improvement best practices, FEMA flood damage research, and real-world user experiences with water intrusion prevention. The diagnostic methods and sealing techniques described are based on standard approaches used by home inspectors and weatherproofing professionals. FloodTape® recommendations reflect the product's documented performance in residential and commercial applications across flood-prone regions.
Cited Works
Federal Emergency Management Agency (FEMA) — "Flood Damage Costs." https://www.fema.gov/flood-insurance
FloodTape® Customer Reviews — "Real User Experiences." https://www.myfloodtape.com/store-locator


Comments