
Protecting Home Gyms, Playrooms, and Finished Garages from Water Intrusion

That basement home gym you spent months setting up. The playroom where your kids spend every rainy afternoon. The finished garage you converted into a workshop or studio. These spaces represent serious investments—not just in money, but in time, creativity, and the way your family actually lives.
They're also often the first rooms to flood.
Water intrusion in non-traditional living spaces has become an increasingly urgent concern for homeowners. According to the Federal Emergency Management Agency, flooding is the most common and costly natural disaster in the United States, with just one inch of water capable of causing $25,000 or more in damage [1]. For finished basements, converted garages, and ground-level bonus rooms, the stakes are even higher because these spaces typically sit at or below grade level—exactly where water wants to go.
The good news: you don't need a contractor or an engineering degree to protect these areas. With the right preparation and tools like FloodTape®, you can create effective temporary barriers that keep water out and peel off cleanly when the threat passes.
Why Your Converted Spaces Are Particularly Vulnerable
When builders construct basements, garages, and ground-floor additions, waterproofing isn't always their top priority—especially in older homes. These spaces were originally designed for storage or parking, not for housing your $3,000 treadmill or your child's entire toy collection.
The Problem with Ground-Level and Below-Grade Rooms
Water follows gravity. It pools at the lowest points of your property and seeks out any gap, crack, or improperly sealed opening. Your finished basement or converted garage likely has several potential entry points:
Door thresholds and weather stripping gaps that weren't designed for standing water
Window wells that can fill during heavy rain
Foundation-to-floor joints where slight settling has created hairline cracks
Utility penetrations for HVAC ducts, electrical conduits, and plumbing
Traditional building materials simply weren't designed to handle the kind of flash flooding and heavy rain events that have become more frequent in recent years. The National Oceanic and Atmospheric Administration reports that extreme precipitation events have increased by approximately 30 percent in the United States since 1958 [2].
What's Actually at Risk
The financial exposure in these spaces can be staggering:
Space Type | Common Contents at Risk | Typical Replacement Cost |
Home Gym | Treadmill, weights, mirrors, rubber flooring | $5,000–$15,000+ |
Playroom | Toys, electronics, carpet/padding, furniture | $3,000–$8,000+ |
Finished Garage | Tools, vehicles, workshop equipment, storage | $10,000–$50,000+ |
And that's just the contents. Water damage to drywall, flooring, and insulation can easily double or triple these figures. Plus, there's the mold remediation that often follows—a single mold removal project averages between $1,500 and $9,000, according to the Environmental Protection Agency's guidance on remediation costs [3].

Understanding How Water Actually Gets In
Before you can effectively protect these spaces, you need to understand the common entry points. Water intrusion typically happens through one of four pathways.
1. Door Gaps and Thresholds
This is the most common culprit. Standard exterior doors—even when closed—have small gaps at the bottom and sides. During a flood event, water doesn't politely wait outside. It pushes through these gaps with surprising force.
Garage doors present an even bigger challenge. The average residential garage door has approximately 15 to 20 linear feet of potential entry points where the door panels meet the floor and side jambs.
2. Window Wells and Basement Windows
Below-grade windows are protected by window wells, but these can become collection basins during heavy rain. If your drainage system clogs or gets overwhelmed, water can rise in the well and eventually breach the window seal.
3. Foundation Cracks and Joints
Even hairline cracks in your foundation can allow water intrusion under pressure. The joint where your foundation wall meets the floor slab is particularly vulnerable because concrete naturally contracts as it cures, often creating a slight gap.
4. Utility Penetrations
Every pipe, wire, and duct that enters your home through the foundation creates a potential entry point. Sealants around these penetrations deteriorate over time, and many were never properly waterproofed in the first place.
Where Temporary Flood Barriers Fit in Your Protection Strategy
Before diving into specific solutions, it's worth understanding how temporary barriers like FloodTape® fit into the broader hierarchy of flood protection.
Permanent mitigation measures—such as French drains, sump pumps, proper exterior grading, and foundation waterproofing—form your first line of defense. These systems work continuously, whether you're home or not, to manage groundwater and redirect surface runoff away from your home.
Temporary flood barriers serve a different purpose: they seal entry points against sudden water intrusion during specific flood events. They're designed to be deployed quickly when a threat is imminent, then removed cleanly afterward. FloodTape® falls into this category—it's not a replacement for proper drainage or a sump pump, but rather a rapid-deployment tool that seals the gaps those systems can't address.
Think of it this way: your sump pump handles groundwater that seeps through your foundation. FloodTape® handles the water trying to push through the gap under your basement door during a flash flood.
The FloodTape® Solution for Non-Traditional Spaces
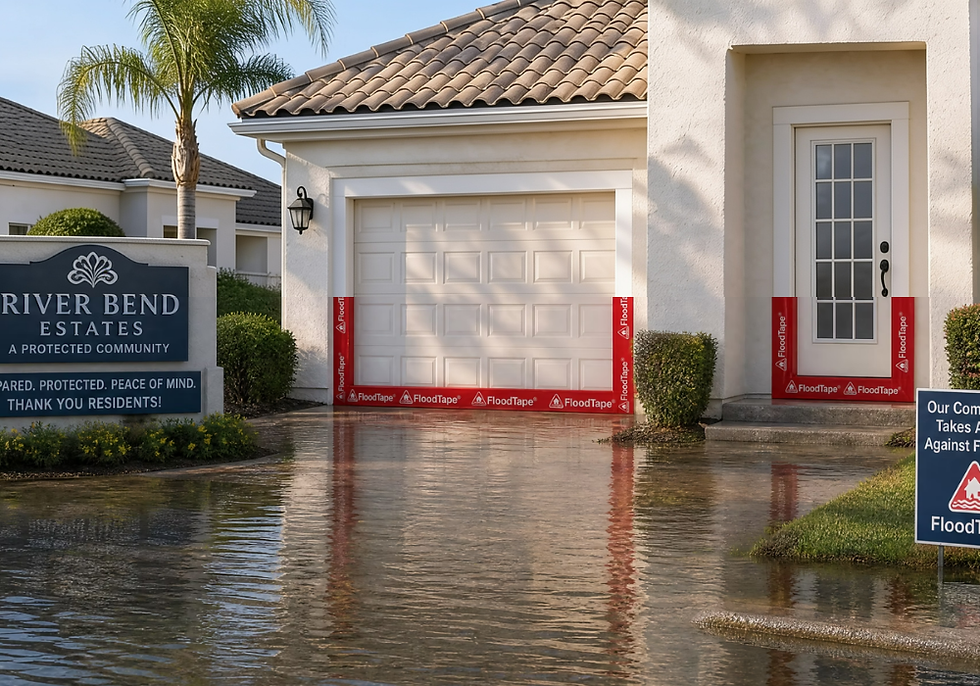
FloodTape® is an 8-inch wide, 20-foot long waterproof adhesive tape specifically designed to seal entry points against water intrusion. Unlike sandbags—which are heavy, messy, and often unavailable right when you need them—this tape applies in minutes and creates a watertight barrier that can help keep floodwater out of your home.
The key advantages for protecting home gyms, playrooms, and finished garages:
Easy to install without tools or professional help
Adheres to multiple surfaces including wood, metal, glass, concrete, and even stucco [4]
Leaves no residue and does not damage paint when removed properly
Lightweight and storable so you can keep it on hand for emergencies
How It Works
FloodTape® uses a double-sided adhesive system that creates a strong seal against water while remaining removable. When applied to a clean, dry surface, it forms a barrier that can help prevent water from pushing through gaps around doors, windows, and other entry points.
One homeowner in Arizona reported that FloodTape® held back two feet of standing water for 24 hours during a flood event at their rental property—with no water penetration. While results can vary depending on installation and conditions, this demonstrates the tape's capability when properly applied.
Step-by-Step Protection Guide for Each Space Type
Here's how to protect your specific spaces using FloodTape® and complementary strategies.
Protecting Your Home Gym
Home gyms often occupy basement space, putting them at elevated risk for water intrusion.
Before the threat arrives:
Identify all entry points. Walk the perimeter of your gym space and note every door, window, and visible utility penetration.
Elevate what you can. Move lighter equipment like dumbbells, yoga mats, and electronics to higher shelves or upstairs. Even six inches of elevation can save items from minor flooding.
Clear the work area. Move exercise equipment away from walls and doors where you'll be applying tape. You need about two feet of clearance.
Clean surfaces thoroughly. FloodTape® adheres best to clean, dry surfaces. Wipe down door frames, thresholds, and window frames with a dry cloth to remove dust and debris.
Applying FloodTape® to basement gym doors:
Start at the bottom corner of the door frame.
Press the tape firmly against the frame, extending it across the threshold and up the opposite side.
For doors with glass panels, run tape along the lower portion where water is most likely to breach.
Overlap tape strips by at least two inches for continuous coverage.
Press firmly along the entire length to ensure good adhesion.

Protecting Your Playroom
Playrooms often contain irreplaceable items—photo albums, children's artwork, special toys. Water damage here hits differently.
Priority protection checklist:
[ ] Seal the main entry door threshold and sides
[ ] Cover any ground-level windows, especially if the playroom is in a basement
[ ] Elevate electronics (gaming systems, tablets, speakers) to shelves at least three feet high
[ ] Store photo albums and paper items in waterproof bins on upper shelving
[ ] Roll up area rugs and store them elevated or in another room
Special consideration for sliding glass doors:
If your playroom has sliding glass doors leading to a patio or backyard, these require extra attention. The track at the bottom of sliding doors is a major vulnerability point.
Clean the entire track thoroughly.
Apply FloodTape® along the outer edge of the track, pressing firmly.
Add a second strip overlapping the first by at least two inches.
Seal the vertical edges where the door meets the frame when closed.
Protecting Your Finished Garage
Garages present unique challenges because of their large door openings and typical construction methods.
The garage door challenge:
Standard garage doors—whether single or double—have significant gap potential. A typical 16-foot double garage door has approximately 40 linear feet of potential entry points when you account for the bottom seal, side jambs, and panel joints.
Strategic approach for garage protection:
Focus on the bottom seal first. This is where most water enters. If your existing rubber seal is cracked or compressed, FloodTape® can reinforce it.
Seal the side jambs carefully. Apply tape vertically along both sides where the garage door meets the frame. Important: apply tape to the frame and the wall surface adjacent to the door—not to the moving door panels themselves. This allows the door to still open in an emergency while creating a seal when closed.
Address the service door. If you have a standard door leading into the garage (common in attached garages), treat it the same way you would a basement door.
Don't forget utility penetrations. Garages often have exposed utility entry points that are easy to overlook.
A note on garage door tracks and rollers: Never tape over the tracks or mechanical components of your garage door. The tape should seal the gaps between the door frame and the wall, not interfere with the door's operation. You need to be able to open the door in an emergency, and blocking the tracks could prevent that.
Protecting high-value equipment:
For items you can't easily move—table saws, workbenches, vehicles—consider these additional steps:
Cover electrical outlets near the floor with waterproof outlet covers
Disconnect power to floor-mounted equipment if flooding is imminent
If you have a vehicle in the garage, move it to higher ground when possible
Before and After: What Proper Protection Looks Like
The Martinez Family: Unprepared
The Martinez family converted their basement into a home gym two years ago. When flash flooding hit their neighborhood, they had no protection in place.
What happened:
Three inches of water entered through the basement door and window wells
Treadmill motor destroyed ($1,800 to replace)
Rubber flooring warped and had to be removed ($600)
Drywall absorbed water up to 18 inches, requiring replacement ($2,200)
Mold remediation required three weeks later ($2,800)
Total damage: $7,400+
The Thompson Family: Prepared
The Thompson family has a similar basement gym setup. When the same type of flooding threatened their area, they were ready.
What they did:
Applied FloodTape® around the basement entry door (15 minutes)
Sealed two basement windows with tape (10 minutes)
Elevated loose equipment to storage shelving (20 minutes)
Unplugged and elevated electronics (5 minutes)
What happened:
Water pooled at sealed entry points but did not penetrate
Gym equipment remained dry
No damage to drywall, flooring, or contents
Total damage: $0
Investment in preparation: Approximately $50 for FloodTape® plus less than one hour of time
Your Complete Protection Checklist
Here's a checklist you can use when a flood threat is approaching:
24-48 Hours Before Expected Water Event
[ ] Check weather reports and flood warnings for your specific area
[ ] Locate your FloodTape® supply and verify you have enough for all entry points
[ ] Inspect doors and windows in vulnerable spaces for existing damage or gaps
[ ] Charge devices and back up important data stored in at-risk areas
[ ] Move irreplaceable items to upper floors or elevated storage
6-12 Hours Before Expected Water Event
[ ] Clean all surfaces where you'll apply tape (door frames, window frames, thresholds)
[ ] Apply FloodTape® to primary entry points (doors first, then windows)
[ ] Seal utility penetrations and any visible cracks
[ ] Elevate remaining floor-level items
[ ] Unplug electronics and appliances in at-risk areas
[ ] Document contents with photos for insurance purposes
During the Event
[ ] Monitor sealed areas periodically if safe to do so
[ ] Stay away from electrical equipment in potentially flooded spaces
[ ] Do not attempt to enter flooded areas
After the Water Recedes
[ ] Wait until water has fully receded before removing tape
[ ] Remove tape slowly, pulling back toward you at a 45-degree angle or lower to prevent surface damage
[ ] Inspect for any water intrusion and document with photos
[ ] Allow space to dry completely before returning items
[ ] Replace any tape that was used (it's designed for single use)

Making This Part of Your Regular Preparedness Routine
Protecting your non-traditional living spaces shouldn't be a last-minute scramble. Here's how to make flood preparedness a normal part of your routine:
Quarterly inspection (takes 15 minutes):
Walk through your home gym, playroom, and finished garage
Check door seals and weather stripping for wear
Verify your FloodTape® supply is accessible and within its two-year shelf life
Note any new cracks or gaps that have developed
Seasonal preparation (spring and fall):
Test your sump pump if you have one
Clear debris from window wells and drainage areas
Review your protection plan with family members
Restock any supplies that have been used or expired
Annual deep check:
Inspect foundation walls for new cracks
Reseal utility penetrations as needed
Review insurance coverage for flood damage
Consider whether any space modifications have created new vulnerabilities
Protect Your Investment Today
Your home gym, playroom, and finished garage represent more than just square footage. They're the spaces where your family exercises, plays, creates, and stores the tools and equipment that support your daily life.
Water doesn't care about your investment. It follows gravity and exploits every gap it can find.
But with proper preparation—identifying vulnerable entry points, keeping FloodTape® on hand, and knowing how to deploy it quickly—you can defend these spaces against water intrusion without breaking your back hauling sandbags or hiring expensive contractors.
Ready to protect your non-traditional living spaces? Get FloodTape® now and have peace of mind before the next storm arrives.

Frequently Asked Questions
Can FloodTape® be used on concrete garage floors?
Yes, FloodTape® adheres to concrete surfaces as long as they're clean and dry before application. For garage floors with painted or epoxy coatings, the tape works particularly well. On raw concrete, ensure you've brushed away any dust or debris for the best seal. The tape is designed for temporary use on these surfaces and removes cleanly when the flood threat has passed.
How much FloodTape® do I need for a standard garage door?
A typical single garage door (8-9 feet wide) requires approximately one roll of FloodTape® to seal the bottom threshold and both side jambs. For a double garage door (16 feet wide), plan on two rolls to ensure complete coverage with proper overlapping. Remember to seal only the frame and adjacent wall—not the door panels or tracks themselves.
Will FloodTape® damage my finished basement's painted door frames?
FloodTape® is specifically designed to remove cleanly without damaging paint or leaving residue. The key is proper removal technique: pull the tape back slowly toward you at a 45-degree angle or lower. Many customers have reported successful removal from painted wood, including antique doors, without any damage.
How long can I leave FloodTape® applied before it becomes difficult to remove?
FloodTape® can remain applied for the duration of a flood event without becoming permanently bonded. However, for best results, remove the tape once the water threat has passed and the area is dry. The tape is designed as a temporary flood barrier, not a permanent installation, and removing it promptly ensures the cleanest peel.
Is FloodTape® effective against sewage backup flooding?
FloodTape® helps create a barrier against water intrusion at entry points like doors and windows. For sewage backup, which typically comes up through floor drains, you'll need additional measures like backflow prevention valves. FloodTape® can be part of a comprehensive protection strategy but works best for surface water intrusion through gaps and seams around doors, windows, and other openings.
Why Trust This Guide
This guide was developed based on real-world flood protection principles and homeowner experiences. FloodTape® was invented by Matthias Herzog, a Florida resident who spent over 15 years dealing with hurricane-related flooding and tested countless solutions before developing this product. The information presented here reflects both industry best practices for flood mitigation and practical knowledge gained from protecting homes in some of America's most flood-prone regions.
Works Cited
[1] FEMA — "Flood Insurance."
[2] NOAA — "Climate Change Indicators: Heavy Precipitation."
[3] EPA — "Mold Remediation in Schools and Commercial Buildings."
[4] FloodTape® — "FAQ: What surfaces does FloodTape adhere to?"


SC88 có dễ dùng không? Mình thử mở nhanh trên máy thì thấy cũng ổn đó: bố cục nhìn gọn gàng nên lướt vài cái là nắm được trang đang nói về gì, không bị rối mắt. Ngay phía trên họ để tiêu đề kiểu “Link Đăng Ký – Đăng Nhập” khá nổi, nên ai cần vào tài khoản chắc khỏi phải tìm vòng vòng trong menu. Mình chỉ xem sơ phần giới thiệu tổng quan thôi, họ viết kiểu ngắn gọn, nhấn vào trải nghiệm chạy mượt với hỗ trợ sẵn sàng nên đọc không mệt. Kéo xuống thêm chút nữa là thấy cách chia khối chữ và heading rõ ràng, canh lề thẳng và font khá dễ nhìn,…
Nãy lướt mấy bài nói về nền tảng giải trí với chuyện giao diện tối ưu, mình hơi nghi ngờ kiểu “nói vậy thôi”. https://sc88bn.com/ nên tối qua mình mở thử trên điện thoại tầm vài phút cho biết, không kỳ vọng gì nhiều. Trang tải lên khá nhanh, bấm qua lại mấy mục mà không bị khựng hay đứng hình, cái này mình đánh giá ổn. Mình để ý cách họ sắp xếp thông tin khá rõ ràng, nhất là phần tài khoản và giao dịch được tách riêng nên nhìn phát là biết chỗ nào để kiểm tra. Màu sắc với chữ cũng vừa mắt, không bị rối hay dày đặc quá. Dùng trên mobile thấy thao tác…
https://suckhoesacdep.net/ mình vừa lướt qua lúc rảnh để xem bố cục họ sắp xếp ra sao, chứ cũng không ngồi đọc kỹ từng dòng. Trên trang thấy các tiêu đề kiểu “giới thiệu tổng quan” và “kết luận” đặt khá rõ ràng, nên chỉ cần kéo xuống một vòng là nắm được họ đang nói gì về thương hiệu và hướng phát triển (mấy đoạn chuyển ý nhìn khá mạch lạc). Nội dung được chia theo từng khối chữ vừa mắt, khoảng cách dòng ổn nên đọc lướt vẫn bắt được ý chính, không bị dính chữ vào nhau. Mình để ý họ có nhắc tới việc đầu tư công nghệ và cải thiện trải nghiệm người dùng, nói ngắn…
Đang nói chuyện bố cục trang với nhau nên mình chợt nhớ tới tylekeonhanh.com, vì hồi đầu mình cũng chuẩn bị tinh thần là sẽ lộn xộn như nhiều site hay gặp. Vào thử thì lại thấy họ trình bày khá “dễ thở”, các khối nội dung chia tách rõ ràng nên mắt quét một vòng là nắm được chỗ nào chính chỗ nào phụ, đỡ phải kéo lên kéo xuống để tìm lại; mình không đọc sâu nội dung đâu, chỉ ngó cách họ sắp xếp thông tin cho người mới ghé, và cảm giác là họ ưu tiên kiểu đọc nhanh trên màn hình, chữ vừa đủ, khoảng trắng ổn, nhìn không bị dày đặc. Menu để ngay…
FLY888 có ổn để ghé xem không? Mình thử vào rồi tự trả lời luôn là cũng ổn áp đấy, ít nhất về cách họ trình bày thông tin cho người mới. Ngay phần đầu đã có dòng kiểu “cập nhật 2026” đặt khá nổi, nên vừa kéo tới là nhận ra trang này đang theo mốc nội dung mới chứ không phải bài cũ nằm lẫn đâu đó. Mình thích nhất là họ làm một khối FAQ cẩm nang cho thành viên mới tách riêng, nhìn vào là biết chỗ để đọc nhanh mấy câu hỏi cơ bản (đỡ phải đoán lung tung). Nói chung mình lướt nhẹ thôi mà vẫn nắm được ý chính, vì chữ chia đoạn…