
Protecting Basement Home Offices from Ground-Level Leaks: A Complete DIY Guide

That quarterly report you've been working on for weeks. The monitor setup you finally invested in. Your collection of client files and reference materials. A single ground-level leak can destroy months of work in minutes—and if you're one of the millions of Americans now working from a basement home office, that threat is closer than you might realize.
The shift to remote work has transformed basements across the country into productive workspaces. But that below-grade space comes with unique vulnerabilities that most home office guides overlook. Ground-level leaks from heavy rain, snowmelt, or rising water tables can infiltrate through window wells, door seals, and foundation cracks faster than you can hit "save."
Protecting basement home offices from ground-level leaks doesn't require major construction or professional contractors. With the right approach and tools like FloodTape®, you can create effective barriers that keep your workspace dry—and remove them without damage when the threat passes.
This guide walks you through exactly how to do it.
Why Basement Home Offices Face Unique Water Threats
Working from a basement puts you at the intersection of two realities: valuable equipment concentrated in one space, and that space being the lowest point in your home's water drainage system.
The Ground-Level Leak Problem
Unlike upper floors, basement home offices face water intrusion from multiple directions simultaneously:
Horizontal infiltration through foundation walls and window wells
Upward pressure from saturated soil and rising water tables
Downward flow from improperly graded landscaping
Seepage around entry points like basement doors, utility penetrations, and HVAC vents
According to the American Society of Home Inspectors, over 60% of American homes have moisture problems in their basements [1]. For a standard living space, occasional dampness might be tolerable. For a home office filled with electronics, documents, and equipment? Even minor moisture can mean disaster.
What's Actually at Risk
The average basement home office contains thousands of dollars in equipment and irreplaceable work:
Asset Type | Typical Water Damage Cost | Recovery Difficulty |
Computers and monitors | $1,000–$3,000+ | Moderate to impossible |
Paper documents and files | Variable | Often impossible |
Furniture and flooring | $500–$2,000+ | Moderate |
Network equipment | $200–$800 | Easy to moderate |
Professional equipment (printers, scanners) | $300–$1,500 | Moderate |
Beyond the financial hit, there's the productivity loss. A flooded basement office means missed deadlines, disrupted client relationships, and potentially weeks of recovery time.
A Note for Renters
If you're renting a property with a basement home office, your options for permanent waterproofing improvements are limited. You can't regrade the landscaping or install a sump pump without landlord approval. This makes temporary, removable solutions like FloodTape® particularly valuable—you can protect your workspace without altering the property or violating your lease.
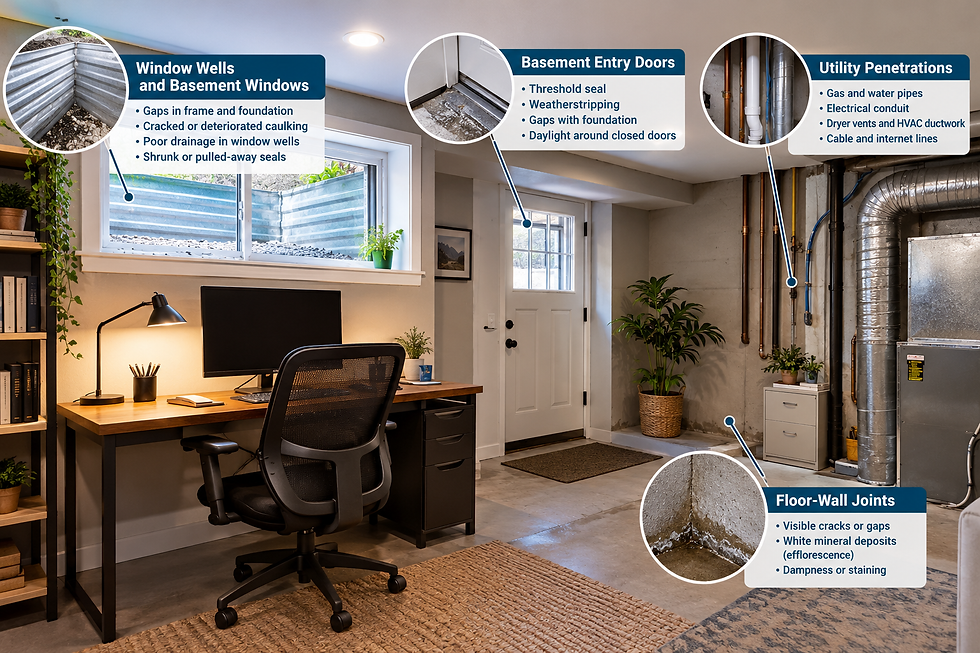
Identifying Your Basement's Vulnerable Entry Points
Before you can protect your workspace, you need to know where water is most likely to enter. Grab a flashlight and take a systematic tour of your basement.
Primary Leak Sources
Window Wells and Basement Windows
Basement windows sit at or below grade level, making them prime targets for water accumulation. Check for:
Gaps between the window frame and foundation
Cracked or deteriorated caulking
Window wells that lack proper drainage
Seals that have shrunk or pulled away
Basement Entry Doors
If your basement has an exterior door or bulkhead entrance, examine:
The threshold seal along the bottom
Weatherstripping around the door frame
Gaps where the door meets the foundation
Any visible daylight around closed doors (a sure sign of gap problems)
Utility Penetrations
Don't overlook the spots where pipes, cables, and vents pass through your foundation:
Gas and water pipe entries
Electrical conduit penetrations
Dryer vents and HVAC ductwork
Cable and internet line entries
Floor-Wall Joints
The joint where your basement floor meets the walls is a notorious weak point. Look for:
Visible cracks or gaps
White mineral deposits (efflorescence) indicating past water presence
Dampness or staining along the base of walls
Quick Assessment Checklist
Run through this checklist during your inspection:
[ ] All basement windows close and seal tightly
[ ] Window well drains are clear and functional
[ ] Door weatherstripping is intact and flexible
[ ] No visible gaps around door frames
[ ] Utility penetrations are sealed
[ ] No cracks wider than 1/8 inch in foundation walls
[ ] Floor-wall joints show no signs of water entry
[ ] Sump pump (if present) is operational
The FloodTape® Solution: Quick, Removable Protection
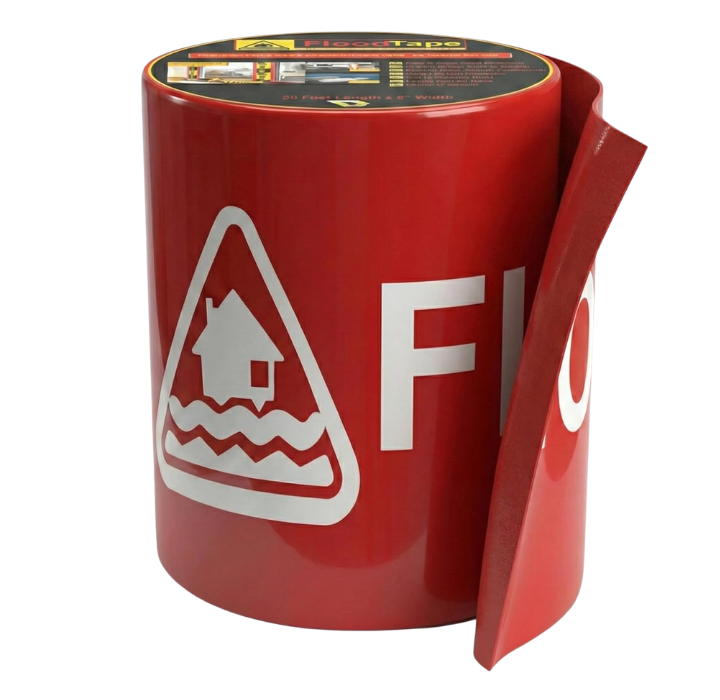
Most basement waterproofing advice focuses on permanent solutions—caulking, installed barriers, or major construction. These work fine for long-term protection, but what about the storms you didn't see coming? Or the temporary seal you need during a weather emergency?
FloodTape® offers something different: a simple DIY flood protection system that creates an effective water barrier you can apply in minutes and remove without damaging paint, wood, or other surfaces.
How FloodTape® Works for Basement Protection
This 8-inch wide, 20-foot long waterproof tape uses a patent-pending adhesive that seals against water while remaining removable. Unlike duct tape (which leaves sticky residue and can peel paint) or silicone caulk (which becomes permanent), FloodTape® is designed specifically for temporary flood protection.
Key advantages for basement home offices:
Rapid deployment – Apply it when severe weather threatens, not as a permanent installation
Clean removal – Peels off slowly at a 45° angle without damaging surfaces
Versatile adhesion – Works on wood, glass, metal, stucco, vinyl, and stone [2]
Wide coverage – The 8-inch width spans most gaps without needing multiple strips
Estimated application time: A typical basement with two windows and one exterior door can
be sealed in approximately 30–45 minutes.
Step-by-Step Application for Basement Entry Points
Protecting Basement Windows:
Clean the window frame and surrounding wall area, removing dust and debris
Ensure surfaces are completely dry before application
Measure and cut FloodTape® to length, adding 4 inches beyond each edge of the window
Starting at one corner, apply the tape so it overlaps both the window frame and the foundation wall
Press firmly along the entire length to create a tight seal
For larger windows, overlap tape strips by at least 2 inches
Pay special attention to corners—use additional tape pieces if needed
Sealing Basement Doors:
Clean the door frame, threshold, and surrounding wall surfaces
Apply tape along the bottom threshold first, extending 3–4 inches up each side
Continue up each side of the door frame, overlapping the threshold pieces
Seal the top of the frame last, ensuring all corners are covered
Press all seams firmly to eliminate gaps
Utility Penetration Protection:
Clean around the pipe or cable entry point
Cut tape to wrap completely around the penetration
Apply tape so it seals both the penetration and the surrounding wall
For round pipes, you may need to make small relief cuts to allow the tape to conform
Removal Instructions
When removing FloodTape®, technique matters. Pull the tape back SLOWLY toward you at a 45° angle or lower. Rushing or pulling straight out can stress the surface underneath. Slow, steady removal at the proper angle keeps your paint and finishes intact.
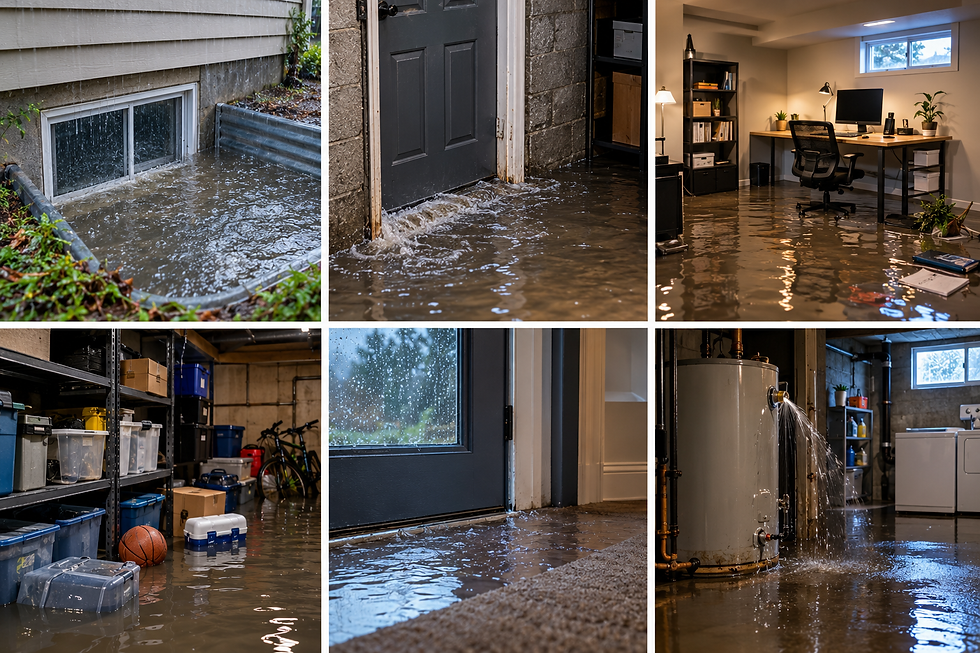
Real Protection Scenarios
Understanding how FloodTape® performs in actual situations helps you plan your protection strategy.
The Predicted Storm
Sarah works from her basement office in a flood-prone area of Florida. When a hurricane warning gave her 48 hours to prepare, she focused on her two window wells and bulkhead door—common entry points for storm surge and heavy rain.
She cleaned and dried all entry points, then applied FloodTape® around both basement windows and the bulkhead door frame. Total application time: approximately 45 minutes.
Despite several inches of standing water in her window wells during the storm, no water entered her workspace. Her computer equipment, files, and furniture remained completely dry. Once the storm passed and water receded, she removed the tape slowly at a 45° angle—no residue, no paint damage.
The Unexpected Downpour
Marcus recently converted his basement into a home office for his consulting business. A sudden severe thunderstorm dropped heavy rain while he was in a client meeting upstairs. He noticed water beginning to seep around his basement's exterior door.
He grabbed his pre-positioned roll of FloodTape®, quickly towel-dried the door frame to create a surface dry enough for the adhesive to grip, and applied tape around the threshold and lower frame sections while the storm continued.
The tape created an immediate barrier, stopping additional water from entering. The small amount that already seeped in was easily mopped up. His electronics and client files remained undamaged.
Important note: For best adhesion, surfaces should be completely dry before application. In emergency situations like Marcus's, towel-drying a seeping area may provide enough surface dryness for the tape to adhere and slow water entry—but this approach is a backup measure, not ideal practice. The best protection comes from applying FloodTape® before water arrives.
Seasonal Protection
Jennifer's basement office in New England faces annual threats from spring snowmelt. Every year, saturated soil pushes moisture through her window wells during the March-April thaw.
Each spring, she applies FloodTape® around her basement windows before the main snowmelt period. She leaves it in place for 3–4 weeks during the highest-risk period. (FloodTape® can remain in place for extended periods when needed, though it should be used within 24 months of purchase if stored properly [3].)
Her home office stays dry through multiple freeze-thaw cycles. When the threat passes, she removes the tape without any surface damage and stores any remaining tape for the following year.
Note on extended outdoor exposure: If FloodTape® will be exposed to direct sunlight on basement windows for several weeks, the UV exposure may affect removal ease. Check periodically and consider removing and reapplying if the tape shows signs of weathering.
Creating Your Basement Home Office Protection Plan
Random preparation won't cut it. A systematic approach keeps your workspace protected.
Essential Equipment Checklist
Keep these items accessible near your basement office:
[ ] FloodTape® – at least one roll per window and door, plus one backup roll
[ ] Clean, dry cloths for surface preparation
[ ] Flashlight for inspecting seals and corners
[ ] Utility knife or scissors for cutting tape
[ ] Phone charger and backup battery (you'll want communication if a storm hits)
[ ] Waterproof container for critical documents
[ ] Plastic bins on wheels for rapid equipment elevation
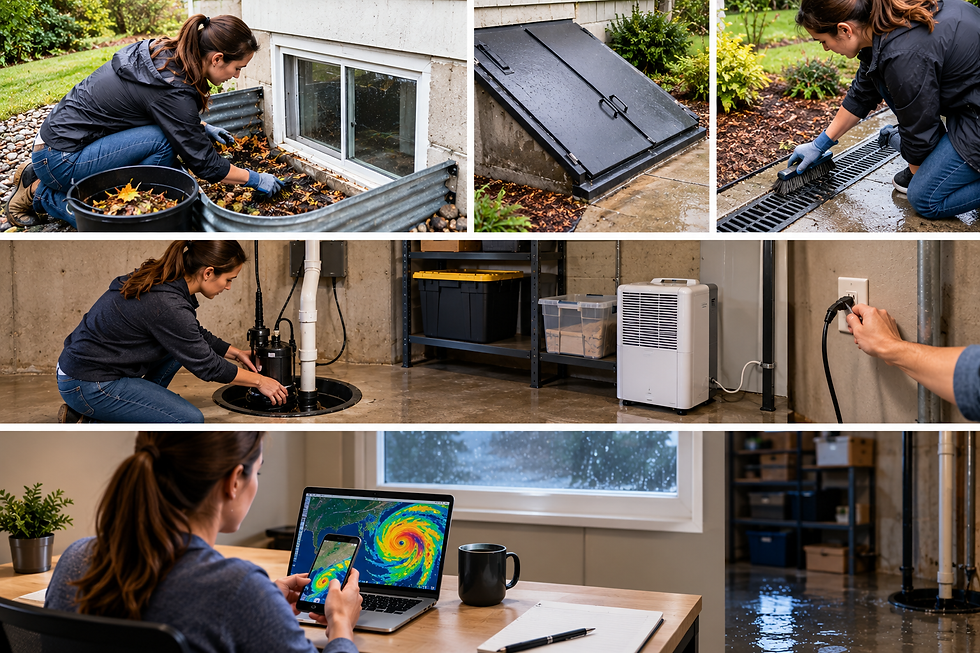
Pre-Storm Action Protocol
When severe weather threatens, work through this sequence:
24+ Hours Before:
Check weather forecasts and flood risk information from sources like Ready.gov or FEMA's flood map service center [4]
Inspect all basement entry points for existing damage
Clear debris from window wells and exterior drains
Ensure sump pump is operational (if applicable)
Back up all digital work to cloud storage
6–12 Hours Before:
Clean and dry all surfaces where you'll apply FloodTape®
Apply tape to all vulnerable entry points
Elevate critical equipment on desks or shelving if possible
Move irreplaceable documents to waterproof containers
Charge all devices and backup batteries
During the Event:
Monitor basement for any water intrusion
If leaks appear in new areas, dry the surface and apply additional tape if conditions allow
Keep critical equipment unplugged if flooding seems likely
Document any water damage for insurance purposes
Post-Storm Recovery Steps
Wait until water has fully receded before removing tape
Remove FloodTape® slowly, pulling toward you at a 45° angle or lower
Inspect all entry points for any damage that needs permanent repair
Check equipment for moisture exposure before powering on
Run a dehumidifier to remove excess moisture from the air
Document any damage and contact insurance if needed
Long-Term Basement Home Office Resilience
FloodTape® provides excellent temporary protection, but building true resilience means addressing permanent vulnerabilities too.
Complementary Improvements
Consider these upgrades alongside your FloodTape® strategy:
Improved window well drainage – Ensure window wells have gravel bases and functional drains
Exterior grading – Slope soil away from your foundation (at least 6 inches of drop over 10 feet)
Gutter maintenance – Keep gutters clear and extend downspouts at least 4 feet from the foundation
Sump pump backup – Install a battery backup if your basement relies on a sump pump
Dehumidifier – Reduce ambient moisture that can damage electronics over time
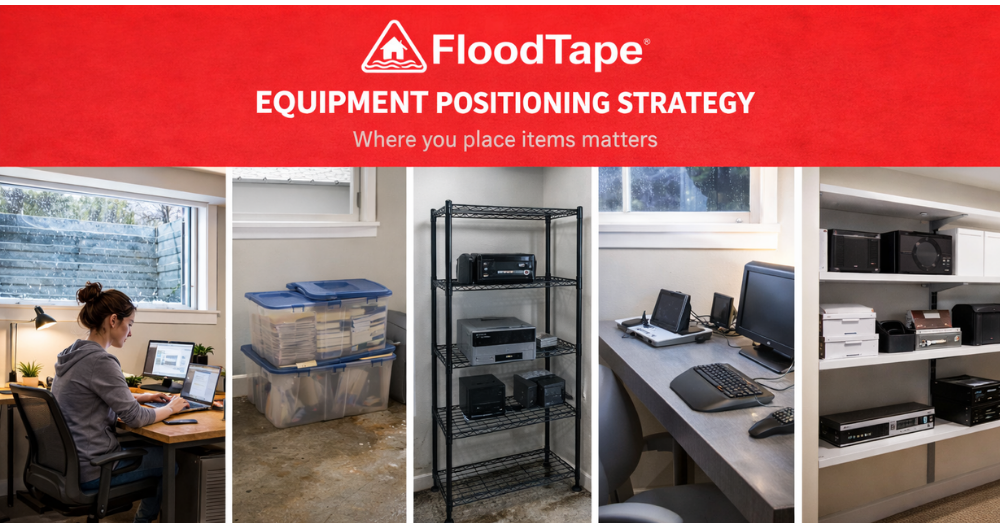
Equipment Positioning Strategy
Where you place items matters as much as how you protect entry points:
Keep computers and monitors on elevated desks, not floor level
Store paper files in sealed plastic bins rather than cardboard boxes
Position essential equipment away from windows and doors when possible
Use surge protectors with ground fault protection for all electronics
Install wall-mounted shelving for critical items and backup equipment
Protect Your Workspace, Protect Your Livelihood
Your basement home office represents more than just a place to work. It's where you meet deadlines, serve clients, build your career, and create value. Ground-level leaks threaten all of that—but they don't have to succeed.
With a clear understanding of your basement's vulnerabilities, the right tools like FloodTape®, and a systematic protection plan, you can keep working confidently no matter what the weather brings.
The best time to prepare was before the last storm. The second best time is right now.
Ready to protect your basement home office? Get FloodTape® today and have it on hand before the next weather event threatens your workspace.
Frequently Asked Questions
How long can FloodTape® stay on my basement windows?
FloodTape® is designed as a temporary flood protection solution and can remain in place for extended periods when needed. For best results, apply it when flooding threatens and remove it after the risk passes. If you're storing rolls for future use, plan to use them within 24 months of purchase for optimal adhesive performance [3]. For extended outdoor applications with UV exposure, check periodically and consider reapplication if weathering occurs.
Will FloodTape® work on rough surfaces like concrete or cinder block?
FloodTape® adheres to a variety of surfaces including wood, glass, metal, stucco, vinyl, and stone [2]. For very rough or porous surfaces like unpainted concrete block, applying the tape to adjacent smoother surfaces (like window frames or door jambs) typically provides better adhesion and sealing performance.
Can I use FloodTape® on the inside of my basement windows, or does it need to go outside?
You can apply FloodTape® from inside your basement, sealing around window frames where they meet the interior wall surface. This approach is often more practical since you can apply it quickly during an emergency without going outside in severe weather conditions.
How much FloodTape® do I need for a typical basement home office?
Measure the perimeter of each window and door you need to protect. A single 20-foot roll typically covers 1–2 standard basement windows or one exterior door, depending on size. Having an extra roll on hand ensures you can address unexpected vulnerabilities or reinforce existing seals if needed.
What should I do if water gets past the FloodTape® seal?
If you notice water intrusion despite the tape, additional tape may be applied to reinforce problem areas—but only if you can dry the surface adequately first. For significant water entry, focus on protecting equipment and documents while the storm passes, then address permanent repairs afterward. No temporary solution can guarantee complete protection against all flood conditions.
About This Guide
This guide was developed by the FloodTape® team, drawing on extensive experience protecting homes and businesses in flood-prone regions across the United States.
FloodTape® was invented by Matthias Herzog, a Florida resident who spent 15 years dealing with hurricane-related flooding before developing a solution that actually works without damaging property upon removal [5]. Our patent-pending technology reflects real-world testing and customer feedback from homeowners who've successfully protected their spaces through storms, flash floods, and seasonal water events.
Cited Works
[1] American Society of Home Inspectors — "Moisture in Basements." https://www.homeinspector.org/
[2] FloodTape® — "FAQ: What surfaces does FloodTape® work on?" https://www.myfloodtape.com/faq
[3] FloodTape® — "FAQ: Storage and Shelf Life." https://www.myfloodtape.com/faq
[4] Ready.gov — "Floods." https://www.ready.gov/floods
[5] FloodTape® — "About the Creator and Designer." https://www.myfloodtape.com/about


Comments