
Sealing Drafty Attic Hatches and Pull-Down Stairs Before Winter

Your attic hatch might be the biggest air leak in your house—and you've probably never given it a second thought.
Most homeowners spend time weatherstripping windows and adding door sweeps, which helps. But that plywood square in your ceiling? It's often completely unsealed, acting as a direct pathway for heated air to escape into your attic. And if you have pull-down stairs, the gaps around that panel can be even worse.
The good news: sealing drafty attic hatches and pull-down stairs before winter is one of the fastest, cheapest DIY weatherization projects you can tackle. We're talking about 20 minutes, basic materials, and measurable results on your next heating bill.
Let's walk through why this matters, what your options are, and exactly how to get it done.
Why Attic Hatches and Pull-Down Stairs Leak So Much Heat

Warm air rises—that's basic physics. During winter, the heated air inside your home constantly pushes upward toward your ceiling, looking for any gap or crack to escape through. Building scientists call this the stack effect: as warm air leaks out through upper-level openings, cold outdoor air gets pulled in through lower-level gaps to replace it [1].
Your house essentially behaves like a chimney. And your unsealed attic hatch? That's the flue.
The numbers tell the story clearly. ENERGY STAR estimates that homeowners who properly air-seal and insulate their homes can save an average of 15% on heating and cooling costs—and unsealed attic penetrations rank among the worst offenders they identify [2]. The U.S. Department of Energy places air sealing near the top of its cost-effective weatherization recommendations, noting that basic sealing work often pays for itself within a year [1].
Signs your attic hatch or stairs may be leaking:
A noticeable cold spot on the ceiling near the hatch
The hallway below the access point always feels drafty
Visible dust streaks around the hatch seam (air movement deposits dust)
Frost or condensation forming near the opening during cold snaps
Your heating system runs more frequently than it should
If two or more of those sound familiar, you've found your problem.
Common Fixes: What Works, What Falls Short
You have several options for addressing a leaky attic access point. Each has tradeoffs worth understanding before you choose.
Fix | Cost | Difficulty | Considerations |
Adhesive weatherstripping | $ | Easy | Compresses over time; often doesn't fully seal uneven gaps |
Rigid foam board glued on top | $$ | Moderate | Adds insulation value but doesn't stop air movement around the seam |
Attic tent/insulated cover | $$$ | Moderate | Effective but bulky; must be moved aside every time you access the attic |
FloodTape® seam seal | $ | Very easy | Seasonal application—you'll remove and reapply as needed |
How Traditional Weatherstripping Works

Standard adhesive weatherstripping (foam tape or V-strip) attaches around the frame where the hatch or stair panel rests. When closed, the hatch compresses against the weatherstripping to create a seal.
Pros: Inexpensive, widely available, doesn't interfere with attic access.
Cons: Weatherstripping compresses and loses effectiveness over time—often within a single season. It also struggles with warped frames or panels that don't sit perfectly flat, leaving gaps that continue leaking air.
If you choose this route, use high-quality silicone or rubber weatherstripping rather than cheap foam, and plan to replace it annually.
How Rigid Foam Insulation Works
Cutting a piece of rigid foam board (1–2 inches thick) to fit on top of your attic hatch adds R-value, which slows heat transfer through the panel itself.
Pros: Addresses the fact that most hatch panels are just thin plywood with almost no insulating value.
Cons: Foam board helps with conduction (heat moving through the material) but does nothing about convection (air moving around the edges). If the seam between hatch and frame isn't sealed, warm air still escapes freely around the foam.
For best results, combine foam insulation with an air-sealing method.
How Attic Tents Work
An attic tent is a fabric and insulation cover that sits over your entire hatch opening from inside the attic. It zips open for access and creates both an air barrier and insulation layer.
Pros: Comprehensive solution that addresses both air sealing and insulation in one product.
Cons: Costs $100–$200, requires you to climb into the attic to install it, and must be opened every time you need attic access—which can be awkward with pull-down stairs.
This option makes sense for homeowners who rarely use their attic and want a set-it-and-forget-it solution.
Using FloodTape® as a Seasonal Attic Seal
Here's an approach that most people don't consider: using FloodTape® to create a tight, temporary seal around your attic hatch or pull-down stairs during the coldest months.

FloodTape® was designed to keep floodwater out of homes, which means it creates an exceptionally tight seal against air and moisture. The same properties that block water also block drafts, dust, and cold air infiltration [3].
Important to understand: This method temporarily seals your attic access shut. It works best for homeowners who don't need frequent attic access during winter months. If you regularly retrieve holiday decorations, check on HVAC equipment, or use your attic for storage you access often, this approach may not fit your situation—or you'll need to plan your attic trips and reseal afterward.
Step-by-Step: Sealing an Attic Hatch with FloodTape®
Materials needed:
One roll of FloodTape® (8 inches wide, 20 feet long) [4]
Clean dry cloth
Utility knife or scissors
Measuring tape (optional)
Installation process:
Clean and dry all surfaces. Wipe down the hatch edges and the surrounding frame or trim with a dry cloth. The adhesive bonds best to clean, dry material—wood, painted trim, metal, and drywall all work well [3].
Identify your seam line. Run your hand around the gap where the hatch meets the frame or stop. Feel for air movement on a cold or windy day. That seam is your target.
Measure and cut your strips. A standard attic hatch has roughly 8–10 feet of perimeter seam. One roll of FloodTape® provides 20 feet, giving you plenty of material with room to spare [4]. Cut strips to match each side of the hatch.
Apply the tape over the seam. Peel the backing and press the tape firmly so it bridges both the hatch panel and the frame, covering the gap completely. Smooth it down with your palm, working from the center outward to eliminate air bubbles.
Overlap at corners. Where strips meet, overlap by an inch or two to prevent any gaps. A continuous seal matters more than neat appearance.
Press firmly along the entire length. The strong adhesive needs good contact to form a tight seal. Go back over the tape once more, pressing firmly.
Safety note: If your attic access is near a furnace flue, water heater vent, or chimney chase, do not seal around combustion vents or their surroundings. The Department of Energy recommends using fire-resistant materials near any combustion appliance venting [1]. Seal the hatch seam only—never obstruct safety equipment.
Step-by-Step: Sealing Pull-Down Attic Stairs
Pull-down stairs present a bigger challenge than hatches. The opening is larger, the panel is heavier, and the seams run longer—often with visible daylight around the edges after a few years of use.
The process is similar to sealing a hatch, with two key adjustments:
Account for the longer perimeter. A typical pull-down stair opening measures roughly 22" × 54", giving you about 13 feet of seam to cover. One roll still handles the job with material to spare.
Don't skip the hinge side. The seam along the hinge edge often hides the worst gap because the panel doesn't sit flush there. It's awkward to reach, but that's exactly where cold air enters. Seal all four sides completely.
Check the latch area. Pull-down stairs have a latch mechanism that can create small gaps. Apply tape over the entire seam, including around the latch area, for complete coverage.

Removing FloodTape® When Spring Arrives
One of FloodTape®'s key advantages for this application: it leaves no residue and does not damage paint when removed properly—unlike duct tape, which often peels paint off when you try to remove it [3].
The removal technique matters. Follow it exactly:
Pull the tape back SLOWLY toward you at a 45° angle or lower.
Don't yank it straight off or pull it away from the surface at a steep angle. Slow, low-angle removal allows the adhesive to release cleanly without pulling up paint or leaving sticky residue behind.
Take your time. Rushing the removal process is how people damage their trim. A few extra minutes of patience means nothing to scrub, scrape, or repaint afterward.
Before-and-After: What to Expect
Scenario 1: The Quick Weekend Fix
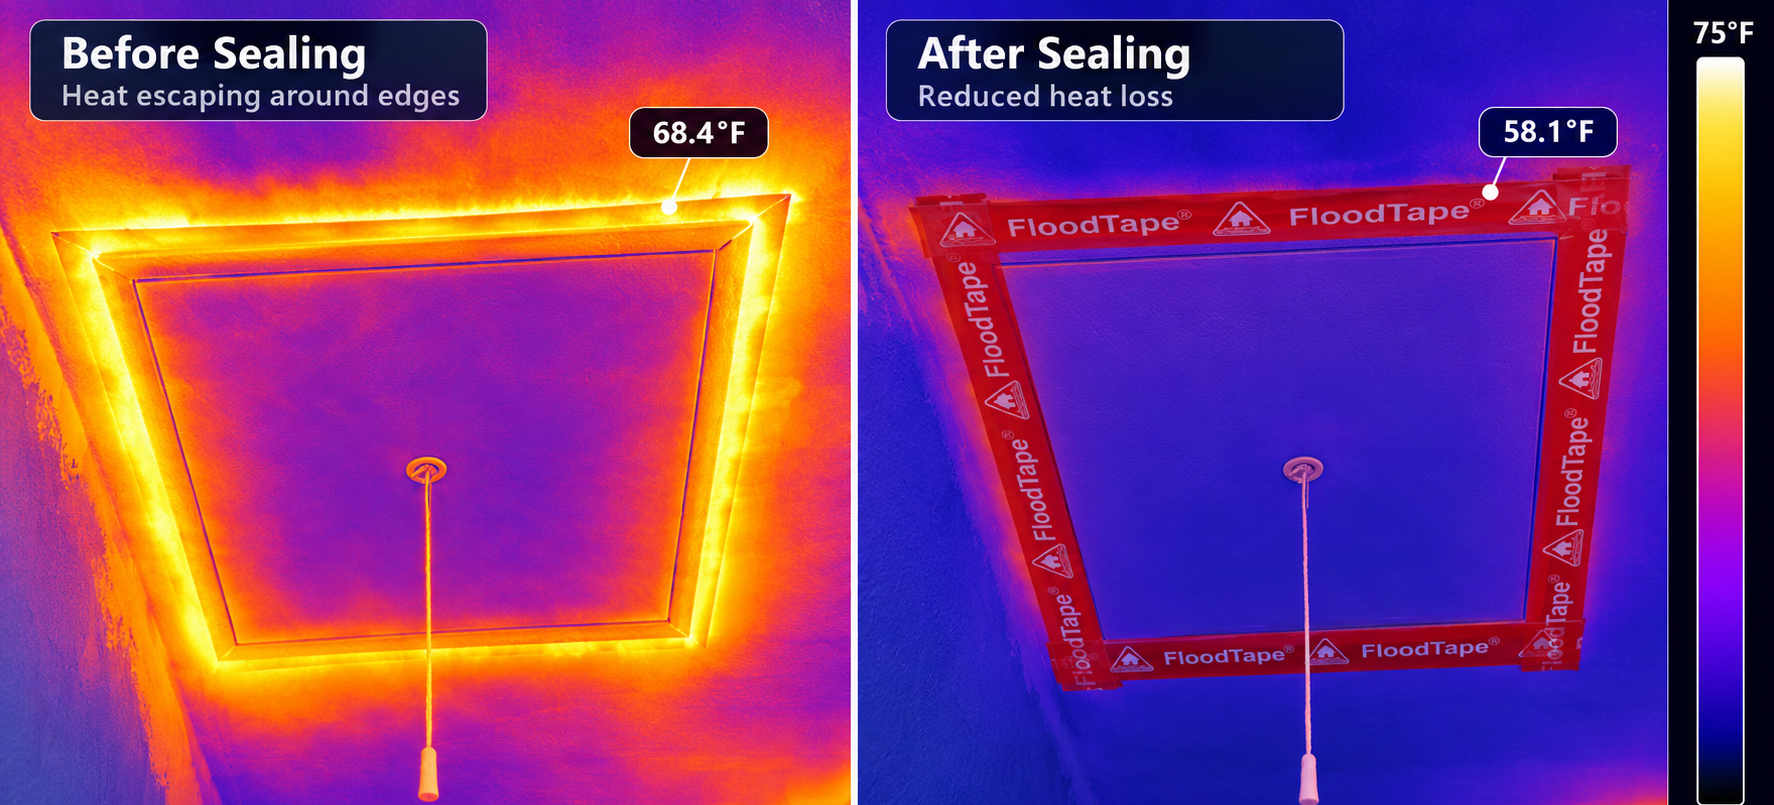
Before: A homeowner notices the upstairs hallway always feels cold, and there's a distinct draft when standing under the attic hatch. The furnace cycles on and off constantly during cold, windy nights. Holding a hand near the hatch seam reveals noticeable air movement.
After: Twenty minutes of work with FloodTape® seals the hatch perimeter completely. The draft under the hatch disappears immediately. The cold spot on the ceiling warms up within a day as the heating system catches up. The furnace settles into a normal rhythm instead of running constantly.
Scenario 2: The Comprehensive Upgrade
Before: Pull-down attic stairs with visible gaps around all four edges, plus a bare plywood panel that conducts heat straight through. The homeowner has already tried foam weatherstripping, but the uneven frame leaves gaps the weatherstripping can't fill.
After: FloodTape® seals the entire perimeter, including the problem areas the weatherstripping missed. A piece of rigid foam board glued to the attic side of the panel adds insulation value. Together, the tape stops air movement while the foam reduces heat conduction. What was the home's biggest ceiling leak becomes one of its tightest spots—no contractor required.
Your Pre-Winter Attic Hatch Checklist
Run through this list this weekend:
✅ Do the hand test: On a cold or windy day, feel around the hatch seam for moving air
✅ Check for visual clues: Look for dust streaks or discoloration around the edges
✅ Inspect existing weatherstripping: Is it cracked, flattened, or missing entirely?
✅ Decide on your approach: Weatherstripping for maintained access, or FloodTape® for maximum seal
✅ Clean and dry surfaces before applying any sealing material
✅ Apply your seal across every seam, overlapping at corners
✅ Consider adding rigid foam to the panel top for bonus insulation value
✅ Keep combustion vents and flues tape-free
✅ Mark your calendar for spring removal (45° angle, nice and slow)
Ready to Seal Out the Cold?
Your attic hatch doesn't have to drain your heating budget all winter. Grab a roll of FloodTape®—20 feet of easy-to-install, affordable sealing power that peels off clean when warmer weather returns. Want installation details first? Check the FAQ for guidance and get it done this weekend.
Frequently Asked Questions
Can I still access my attic after sealing the hatch with tape?
Yes, but it requires planning. The seal is temporary by design. When you need access, slice the tape cleanly along the seam with a utility knife, complete your attic business, then apply fresh tape to reseal. If you access your attic frequently during winter, traditional weatherstripping may be a better fit for your situation.
Will FloodTape® damage my paint or leave residue?
No, when removed correctly. FloodTape® was specifically designed to come off cleanly without damaging paint or leaving sticky residue, even on finished wood trim [3]. The key is technique: pull the tape back slowly toward you at a 45° angle or lower. Avoid yanking or pulling straight away from the surface.
How much can sealing an attic hatch actually save on heating bills?
Results depend on your home, climate, and how leaky your hatch is. ENERGY STAR estimates an average of 15% savings on heating and cooling costs for homeowners who properly air-seal and add insulation [2]. Your attic hatch is one piece of that puzzle—and at around $50 per roll, it's among the cheapest pieces to address.
Isn't FloodTape® designed for flooding? Why use it for drafts?
Exactly because it creates such a tight seal. The same properties that block floodwater also block air infiltration, dust, and moisture [3][4]. It functions as a versatile seasonal tool: storm protection in summer, draft prevention in winter.
How much tape do I need for one attic hatch?
One 8-inch-wide, 20-foot roll covers a standard attic hatch with plenty left over—most hatch perimeters run about 8–10 feet of seam [4]. Pull-down stairs typically need 12–14 feet of coverage, so one roll still handles the job with material to spare.
About the Expertise Behind This Guide
FloodTape® was invented by Matthias Herzog, a longtime resident of hurricane-prone St. Augustine, Florida, who spent over 15 years dealing with storm surges, sandbags, and the sticky aftermath of duct tape before engineering something better. Every FloodTape® article draws on real product testing, homeowner feedback, and research from trusted authorities including the U.S. Department of Energy and ENERGY STAR. We explain what the product does, what it doesn't, and exactly how to use it—because honest guidance builds trust.
Cited Works
[1] U.S. Department of Energy — "Air Sealing Your Home." https://www.energy.gov/energysaver/air-sealing-your-home
[2] ENERGY STAR — "Seal and Insulate with ENERGY STAR." https://www.energystar.gov/saveathome/seal-insulate
[3] FloodTape® — "FAQs for FloodTape® | DIY Flood Protection System." https://www.myfloodtape.com/faq
[4] Duke Product Line — "Simple DIY Flood Protection Tape — 8 Inch Extra Wide by 20 Feet Long." https://www.myfloodtape.com/product/flood-protection-tape

Comments