
Moisture Intrusion in Basements and Crawl Spaces: How to Stop Mold Before It Starts

Moisture is infiltrating your basement or crawl space right now—and you probably don't know it. By the time you smell that telltale mustiness or spot the first patch of fuzzy growth on a floor joist, the problem has already taken hold.
According to the Environmental Protection Agency, mold can begin growing on damp surfaces within 24 to 48 hours [1]. A single slow leak around a basement window, humidity seeping through foundation cracks, or groundwater pressure after a heavy rain can trigger a chain reaction that costs thousands in remediation—and creates respiratory risks for everyone living above it.
Here's what most homeowners don't realize: the majority of moisture intrusion is preventable. Identifying where water enters and sealing those vulnerable points stops mold before it ever gains a foothold. For homeowners who want a fast, effective DIY approach without permanent modifications or messy residue, products like FloodTape® create temporary watertight seals that can be removed cleanly when conditions improve.
This guide walks through how moisture intrusion happens, why your basement and crawl space are prime targets, and exactly what you can do to protect your property.
Why Basements and Crawl Spaces Attract Moisture
Your basement and crawl space share a fundamental vulnerability: they're the lowest points in your home, surrounded by soil that holds moisture like a sponge.
Every time it rains, water pressure builds against your foundation walls. This hydrostatic pressure can force water through hairline cracks, gaps around utility penetrations, and poorly sealed window wells. Crawl spaces face an additional challenge—the soil beneath your home constantly releases moisture vapor through evaporation. Without proper vapor barriers or ventilation management, that moisture migrates upward into floor joists, insulation, and eventually your living spaces.
Several factors make these areas particularly susceptible:
Limited air circulation traps humidity and prevents natural drying
Cool temperatures cause condensation when warm, moist air enters
Porous concrete absorbs and transmits water vapor from surrounding soil
Gaps around pipes, wires, and vents create direct pathways for water entry
Aging weatherstripping on basement windows and doors fails to keep moisture out
The Federal Emergency Management Agency notes that even homes without flood history can suffer significant water damage from moisture intrusion through foundation walls and floors [2]. You don't need a flood to develop a mold problem—consistent dampness is enough.
The Real Cost of Ignoring Moisture Problems
Mold isn't just unsightly. It's destructive and potentially dangerous.
Structural damage accumulates gradually.
Wood framing and floor joists absorb excess moisture, leading to rot, warping, and weakened structural integrity. The American Society of Home Inspectors reports that moisture-related damage ranks among the most common issues found during home inspections [3].
Health concerns are equally serious.
The Centers for Disease Control and Prevention links mold exposure to respiratory symptoms, allergic reactions, and worsening asthma symptoms [4]. For families with young children, elderly members, or anyone with compromised immune systems, a moldy basement represents a genuine health risk.
Financial impact adds up quickly.
Professional mold remediation costs range from several hundred to several thousand dollars depending on contamination extent. That figure doesn't include repairing the water damage that caused the problem in the first place.
The frustrating reality? Most moisture intrusion is preventable with the right approach.

Common Entry Points for Moisture Intrusion
Understanding how water enters your basement or crawl space is the first step toward stopping it.
Foundation Cracks and Joints
Concrete naturally develops hairline cracks as it cures and settles over time. These tiny fissures may seem insignificant, but they become highways for water migration. The joint where your basement floor meets the walls—called the cove joint—is another notorious weak point where water commonly seeps through.
Window Wells and Basement Windows
Older basement windows often have deteriorated seals or gaps around the frame. Window wells can collect rainwater if they lack proper drainage, essentially creating small pools that push water directly against your window openings.
Utility Penetrations
Every pipe, wire, or duct that passes through your foundation wall creates a potential entry point. The gaps around these penetrations may be minimal, but water is remarkably persistent. It finds a way.
Crawl Space Vents and Access Doors
Crawl space vents were once standard practice, based on the theory that ventilation would keep moisture levels down. Building science research has since shown this approach often backfires in humid climates, allowing warm, moist outside air to enter and condense on cooler surfaces [5]. Access doors that don't seal properly compound the problem.
Floor Drains and Sump Pits
Ironically, systems designed to remove water can also allow moisture in. Dried-out floor drain traps lose their water seal, permitting humidity to enter. Sump pits without proper covers allow moisture evaporation directly into your basement air.
DIY Moisture Prevention: A Step-by-Step Approach
You don't need professional contractors or expensive equipment to make a significant dent in moisture intrusion. Here's a practical approach that prioritizes high-impact, low-cost interventions.
Step 1: Conduct a Moisture Audit
Before sealing anything, identify where water is getting in. Look for:
Water stains or efflorescence (white mineral deposits) on walls
Musty odors, especially in corners and behind stored items
Visible mold growth on surfaces or materials
Condensation on windows, pipes, or walls
Damp or soft spots in flooring or drywall
A moisture meter—available at most hardware stores for under $30—helps you quantify problem areas and track improvement over time. Pay attention to musty smells even without visible mold, as growth often occurs behind walls or under flooring where you can't see it.
Step 2: Control Exterior Water Flow
The most cost-effective moisture prevention happens outside your house. Ensure gutters are clear and downspouts extend at least six feet from your foundation. Grade the soil around your home so it slopes away from the structure—aim for a minimum of one inch per foot for the first six feet.
Step 3: Seal Obvious Gaps and Penetrations
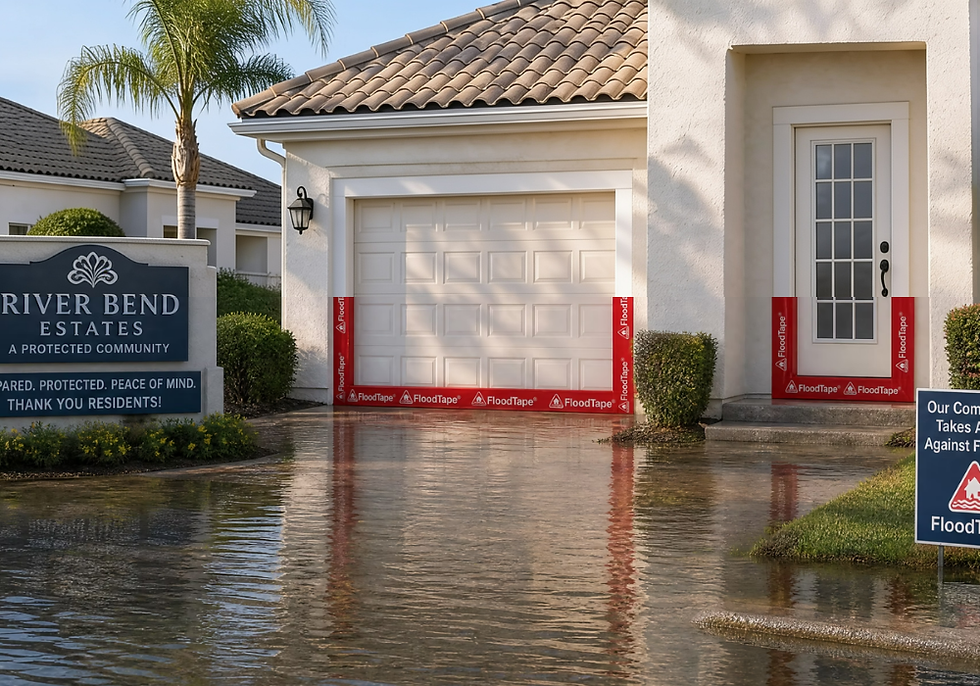
This is where FloodTape® becomes a practical option. Unlike permanent caulks or expanding foams that can be messy to apply and difficult to remove cleanly, FloodTape® creates a watertight seal that installs in minutes and removes without residue or damage to surfaces.
For basement windows: Clean the frame and surrounding wall surface thoroughly. Apply FloodTape® around the entire perimeter, pressing firmly to ensure full adhesion. The tape's 8-inch width provides substantial coverage, allowing you to seal both the window frame and the junction with the wall in a single application.
For utility penetrations: Cut FloodTape® to size and wrap it around pipes or conduits where they enter through walls or floors. The tape adheres to wood, metal, concrete, and plastic, making it versatile enough for nearly any penetration type.
For crawl space access doors: Apply FloodTape® around the door frame to create a temporary seal during wet seasons or storm events. When conditions dry out, simply peel it away—no paint damage, no sticky mess.
Important removal note: When taking off FloodTape®, pull the tape back slowly toward you at a 45-degree angle or lower. This technique ensures clean separation without damaging underlying surfaces.
Step 4: Address Humidity Levels
Even after sealing entry points, you may need to actively manage humidity. A properly sized dehumidifier can maintain levels below 50% relative humidity—the threshold the EPA recommends for preventing mold growth [1].
In crawl spaces, consider encapsulation: covering the dirt floor with a heavy-duty vapor barrier. This single intervention can dramatically reduce moisture levels throughout the space. If your crawl space has vents, closing them may help in humid climates, though this works best as part of a complete encapsulation system since building codes and best practices vary by region.
Step 5: Maintain Ongoing Vigilance
Moisture intrusion isn't a problem you solve once and forget. Seasonal changes, settling foundations, and aging materials mean new vulnerabilities can develop over time. Conduct quarterly inspections of your basement and crawl space, paying particular attention after heavy rains or snowmelt.
Using FloodTape® for Moisture Prevention
FloodTape® was originally designed for emergency flood protection—creating watertight seals on doors, windows, and other openings when floodwaters threaten. Its core features make it equally useful for ongoing moisture management in basements and crawl spaces.
Why it works for moisture intrusion:
Extra-wide coverage: At 8 inches wide, FloodTape® spans gaps and joints that narrower tapes can't adequately cover
Multi-surface adhesion: Bonds effectively to concrete, wood, glass, metal, vinyl, and stucco—covering virtually every material found in basement and crawl space construction
Waterproof barrier: The tape's adhesive creates a seal that blocks both liquid water and water vapor
Clean removal: Unlike permanent sealants, FloodTape® peels away without leaving residue or damaging paint, finishes, or surfaces
This last point matters more than many homeowners realize. Many people avoid sealing gaps because they don't want to commit to permanent modifications or deal with removing failed caulk or foam later. FloodTape® eliminates that concern—apply it seasonally during wet months, remove it when conditions improve, and reapply as needed.

Real-World Scenarios
Scenario 1: The Leaky Basement Window
Before: A homeowner in coastal Florida noticed recurring dampness around their basement windows after every rainstorm. The windows themselves weren't cracked, but the seals around the frames had deteriorated over years of exposure. Water was seeping in along the edges, soaking the drywall below and creating conditions favorable for mold growth.
After: By applying FloodTape® around each window frame—covering both the junction between frame and wall and the lower sill area where water tends to pool—the homeowner significantly reduced water intrusion during subsequent storms. When the wet season ended, they removed the tape in preparation for permanent resealing, finding no damage to the painted surfaces beneath.
Scenario 2: The Humid Crawl Space
Before: A property owner with rental units discovered moisture readings above 70% relative humidity in a crawl space. The access door was the primary culprit—an old wooden hatch that no longer seated properly, allowing humid outside air to flow freely into the enclosed space.
After: FloodTape® applied around the access door perimeter created an airtight seal. Combined with a properly installed vapor barrier on the crawl space floor, humidity levels dropped below 50% within two weeks. The tape remained in place for an entire season before being removed cleanly, with no adhesive residue on the painted door frame.
Scenario 3: The Pipe Penetration Problem
Before: A homeowner noticed mold growth on the wall surrounding a PVC drain pipe that passed through their basement wall. The gap between pipe and concrete was small—less than a quarter inch—but sufficient to allow water vapor migration and occasional seepage during heavy rains.
After: A single strip of FloodTape® wrapped around the penetration point sealed the gap. The flexible tape conformed to both the curved pipe surface and the irregular concrete, creating a barrier that stopped moisture intrusion immediately.
Identifying Hidden Mold
Sometimes mold grows where you can't see it—behind drywall, under flooring, or within wall cavities. Learning to recognize the signs of hidden mold helps you address problems before they become severe.
Warning signs of hidden mold include:
Persistent musty odors without visible mold
Unexplained respiratory symptoms that improve when you leave the house
Wallpaper or paint that bubbles, peels, or discolors
Warped or buckling floors
Condensation that appears repeatedly on windows or pipes
If you suspect hidden mold, a moisture meter can help confirm elevated humidity in walls or floors. For suspected growth covering more than about 10 square feet—or any situation involving potential health effects—consult a professional for proper assessment.
Your Moisture Prevention Checklist
Use this checklist to systematically address moisture intrusion in your basement or crawl space:
Exterior Controls
[ ] Gutters cleaned and flowing freely
[ ] Downspouts extended 6+ feet from foundation
[ ] Ground slopes away from house on all sides
[ ] Window wells have adequate drainage
Basement Sealing
[ ] Cracks in walls and floors identified and marked
[ ] Window frames inspected and sealed as needed
[ ] Utility penetrations sealed with appropriate materials
[ ] Floor drain traps filled with water (or sealed if unused)
[ ] Sump pit covered to prevent evaporation
Crawl Space Protection
[ ] Vapor barrier installed on dirt floor
[ ] Access door seals properly
[ ] Vents assessed based on climate and encapsulation status
[ ] Standing water or excessive dampness addressed
Ongoing Maintenance
[ ] Dehumidifier running (if needed) to maintain <50% humidity
[ ] Quarterly inspections scheduled
[ ] Moisture meter readings logged for comparison
[ ] FloodTape® or other sealants checked and replaced as needed

When DIY Isn't Enough
While most moisture intrusion responds well to the approaches described above, some situations require professional intervention. Consult a waterproofing specialist if you observe:
Large or growing cracks in foundation walls
Significant water pooling or flooding during moderate rain events
Structural damage including bowed walls or sagging floors
Extensive mold growth covering more than 10 square feet
Persistent moisture despite sealing and dehumidification efforts
These conditions may indicate underlying issues beyond simple sealing—things like failed drainage systems, compromised waterproofing membranes, or structural settling that requires engineering assessment.
Prevention Beats Remediation
Moisture intrusion leading to mold is one of those problems that's far easier and cheaper to prevent than to fix after the fact. A few hours of inspection and sealing work, combined with basic humidity management, can protect your property from thousands of dollars in damage and spare your family from potential health effects.
FloodTape® offers a practical option for homeowners who want effective moisture barriers without permanent modifications. It's easy to install, works on virtually any surface, and removes cleanly when no longer needed. For seasonal moisture issues, storm preparation, or temporary sealing while you plan more permanent solutions, it's a tool worth keeping on hand.
Don't wait for the musty smell or visible mold patches to take action. The time to address moisture intrusion is before it gains a foothold.
Ready to protect your basement or crawl space from moisture intrusion? Get FloodTape® now and create watertight seals in minutes—no tools required, no residue left behind.

Frequently Asked Questions
How quickly can mold start growing after moisture intrusion occurs?
Mold can begin growing on damp surfaces within 24 to 48 hours under favorable conditions, according to the EPA. This rapid timeline explains why addressing moisture intrusion promptly matters so much. Even brief water exposure from a single storm can initiate mold growth if surfaces aren't dried thoroughly within that window. Sealing entry points before water gets in is always preferable to dealing with the consequences afterward.
Can FloodTape® be used as a permanent seal for basement moisture problems?
FloodTape® is designed as a temporary flood and moisture protection solution, not a permanent sealant. It excels at creating immediate, watertight barriers that can be removed cleanly without damaging surfaces. For ongoing moisture issues, you might use FloodTape® seasonally during wet months or as a temporary measure while planning permanent repairs. The tape remains effective for extended periods but should be inspected regularly and replaced as needed.
What humidity level should I maintain in my basement to prevent mold?
The EPA recommends keeping indoor humidity levels below 50% to inhibit mold growth. In basements and crawl spaces, aim for 30-50% relative humidity. A quality dehumidifier with a built-in hygrometer helps you monitor and maintain appropriate levels. If humidity consistently exceeds 60% despite running a dehumidifier, you likely have ongoing moisture intrusion that needs to be addressed at the source rather than just managed with dehumidification.
Does FloodTape® work on rough surfaces like concrete block or stucco?
FloodTape® is formulated to adhere to a wide range of building materials including concrete, stucco, wood, glass, metal, and vinyl. The key to successful adhesion on any surface is ensuring it's clean and dry before application. For rough or porous surfaces, press firmly along the entire length of the tape to ensure full contact and create a complete seal. The tape's flexibility allows it to conform to irregular surfaces better than rigid sealants.
How do I know if moisture in my basement is from intrusion versus condensation?
A simple test helps differentiate the two sources: tape a piece of plastic sheeting (about 12 inches square) to your basement wall and seal all edges completely. Leave it in place for 24-48 hours, then check both sides. If moisture collects on the wall side of the plastic, water is migrating through from outside—that's intrusion. If moisture appears on the room side, you have a condensation problem caused by humid indoor air meeting cooler wall surfaces. The solutions differ significantly, so accurate diagnosis matters for effective treatment.
About This Guide
This article was developed by the FloodTape® team, drawing on years of experience helping homeowners protect their properties from water intrusion. FloodTape® was invented by Matthias Herzog, who spent 15 years living in hurricane-prone St. Augustine, Florida, and experienced firsthand the frustration of inadequate flood protection options. The product is manufactured in the USA and has been successfully used by homeowners across the country to defend against flooding, moisture intrusion, and water damage. For more information or installation guidance, visit myfloodtape.com.
Works Cited
[1] U.S. Environmental Protection Agency — "A Brief Guide to Mold, Moisture, and Your Home." https://www.epa.gov/mold/brief-guide-mold-moisture-and-your-home
[2] Federal Emergency Management Agency — "Protect Your Property from Flooding." https://www.fema.gov/flood/how-can-i-help/protect-your-property
[3] American Society of Home Inspectors — "Top Home Inspection Findings." https://www.homeinspector.org/Education-and-Events/Education/Standards-and-resources
[4] Centers for Disease Control and Prevention — "Basic Facts About Mold and Dampness." https://www.cdc.gov/mold/faqs.htm
[5] Building Science Corporation — "Building Science Digest 102: Understanding Basements." https://www.buildingscience.com/documents/digests/bsd-102-understanding-basements


Comments